
What's in the box
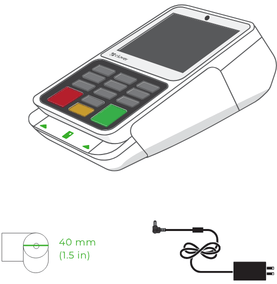
- Clover Compact device
- Power adapter and charging cable
- Receipt paper roll
- Optional PIN shield or accessories
- Quick start guide and paperwork
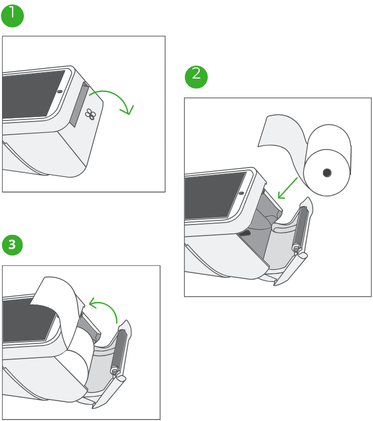
Load the receipt paper
Your Clover Compact comes with a built-in printer for receipts.
- Open the back panel of the device.
- Insert the paper roll with the edge facing upward.
- Pull a small portion of paper through the slot.
- Close the compartment firmly.
A test print will confirm that the paper roll has been loaded correctly.
Connect the power
- Simply Connect your power extension to the device.
- Connect the power cable to your power source.
- Your device will automatically power on.

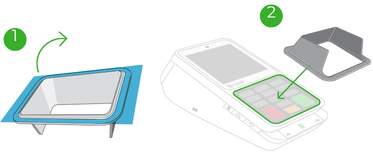
Install the PIN shield (optional)
- Remove film from the back of the shield.
- Place over terminal keyboard and press down firmly.
Activate the Compact
Before activating, make sure your internet is set up. If you plan to connect using WiFi, your router should be set up, connected to the network, and has a security level of WPA or WPA2. Your network needs to be a closed, protected, secure network to process payment transactions.
-
On the Welcome screen, select your preferred language.
-
Select an internet connection method:
-
Use Ethernet with the supplied Ethernet cable.
-
Your device's SIM card can connect to cellular data service.
-
Enter your WiFi network information.
-
-
When you’re prompted to enter an activation code, follow the instructions on the screen to retrieve it. Once you enter the code, Clover will install the latest apps for your device.
-
Continue through the remaining screens to complete the device setup process.
Set a passcode to secure your device
During activation, you’ll have the opportunity to set a passcode. If you already have an admin account, the activation process will not include this step.
Setting a passcode adds an extra layer of security. Employees can have individual passcodes, which makes it easy to track their sales and attendance. You can set passcodes on the Web Dashboard or on the device using the Employees app.